
Come configurare il sistema di illuminazione a LED DMX wireless?
Preparation
After receiving our products, please check if all accessories are complete as below.
1. Every flood light fixture contains an antenna.

2. Controller kit (it contains an SD card, an AC-DC adapter, a USB cable and a remote control).

3. Wireless transmitter (it contains an antenna, an AD-DC adapter and a DMX cable).

Sometimes we will pack all accessories into the same carton. Please confirm with us.
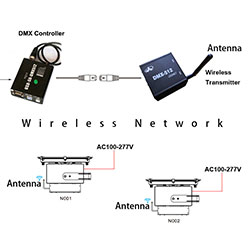
Schema di installazione
The whole system mainly includes three parts: Controllore DMX(with remote control), wireless transmitter and light fixtures.

The DMX controller and the wireless transmitter should be connected together by a DMX cable. The transmitter will convert the wired DMX signals to wireless DMX signals and spread it to all light fixtures. After receiving the wireless signals, each light fixture will decode it and show the corresponding color and effect.
Installation Steps
1. Install the light fixture.
Our light fixtures can be installed on the floor, ceiling, wall or light pole.

The wires info of the power supply: Red is Live wire, Blue is Neutral wire, Yellow is Ground wire.

2. Install the antennas
There is a holder for installing antenna on the bottom of the light fixture. Please screw the antenna into the holder well by clockwise direction as the following picture. The antenna is foldable.

You can refer to this video: https://youtu.be/BIfrylYk3cg.
The light fixture will show the default color or last color when it is given power.
3. Install the controller
The controller contains an SD card which stores the default programs, an adapter and a remote control. Insert the SD card into the controller and connect all cables well.

4. Install the wireless transmitter
The wireless transmitter contains an antenna, an adapter and a DMX cable which is used to connect the controller. Install the antenna well and connect the transmitter and the controller together by the DMX cable.

Please note there are four dip switches on the back side of the transmitter. Set 1, 2, 3 down and 4 up as the following picture. Usually the manufacturer has made this default setting.

When you power up the controller and the transmitter, do not forget to push the power button on the back side of the transmitter. Its LEDs will blink after working.

How to choose the programs?
After the controller and transmitter start to work, you can use the remote control to choose the programs. For example, press key 1 and press key PRG then the 1st program will be chosen. Before you use the remote control, please make sure it contains a battery inside. We normally take off it before the shipment. You can buy it in your local stores.


Following is our default programs with their serial numbers:
0. red
1. green
2. blue
3. white
4. yellow
5. orange
6. cyan
7. purple
8. red fading
9. green fading
10. blue fading
11. white fading
12. red/green/blue changing
13. 7 colors changing
14. shutdown
If you still have any questions on using our wireless DMX flood light system, please feel free to contact us.
Ulteriori letture:
- Cos'è l'illuminazione DMX o DMX512?
- Quali sono le funzioni del decodificatore DMX e del controller DMX?
- Manuale del controller DMX (modello scheda SD e modello PC online)
- Come utilizzare il software di programmazione del controller DMX 512?
- Come scrivere gli indirizzi per i proiettori LED DMX?
- Catalogo luci LED DMX RGB
- Luce di inondazione 100W 200W 300W 500W 800W di DMX RGB LED di alto potere
- Proiettore LED DMX RGB 100W 200W 300W (forma quadrata)
- Proiettore LED DMX RGB 10W 20W 30W 50W
- Proiettore LED RGB con telecomando da 10W a 50W
- Lampada da parete a LED DMX RGB 18W 24W 36W 72W 108W 150W
- Luce subacquea/fontana a LED DMX RGB